 So check it out....I decided to build a garden pond in my backyard. The area we live in is anything but quiet and serene. We're in a suburb outside of Hartford, CT and we're right off a main road so there's lots of traffic noise, sirens, and stuff like that going on all the time. I thought that maybe the pond would be a nice place to try to get away from it all.
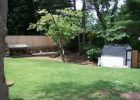
The area where I built it kind of lent itself to the project. It's at the bottom of a slight hill (taboo as a rule for most ponds due to drainage issues which I worked out) and it's in an area that was mainly dead space. It was always all dirt there. I grew grass in the area and it looked great for a while but then it all died practically overnight a few years ago, so I gave up on that. I don't even know what made me think of the pond idea. I just looked out there one day and thought "Hhmm that would be a nice place for a pond".
I bought a couple of books about ponds and did tons of research on the internet. Stole some ideas from some folks and made up some of my own along the way. This is my way of paying those folks back. I hope that people will look at what I did and get some ideas for their own pond project.
Throughout this page you can click on the "slide show" icon for larger versions of the preceding images.
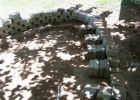
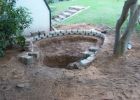
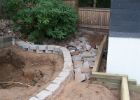
The design of this pond and it's placement within the existing topography required that some of it be raised above existing ground level, while most of it would be dug out. I lined the perimeter of the main pond section with the 1st layer of pavestones. The pavestones were placed atop gravel to facilitate leveling. It was critical that this 1st layer of "bricks" ended up level all around, since this would assure a level and consistent water level in the end. Some of the bricks had to be dug deeper into the ground, while others needed to be raised up. Once the 1st layer was placed and assured to be level, I continued to build the "wall" up to the desired water level of the pond.
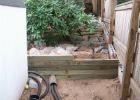
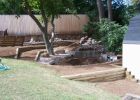
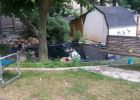
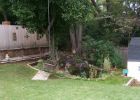
I did all of the digging by hand. I was able to use all of the excavated dirt to landscape the surrounding areas with. I put a wall of larger blocks to separate the main pond from the proposed "pool" section. The guy across the street from me tore down a stone wall in his yard. The wall was made of softball-sized stones encased in concrete. He had them broken up into small sections so I snatched 'em all up and used them as the base for the construction of the stream. I sectioned off the ground around the pond with landscape timbers. My plan was to plant new grass at the top, put some wildflowers in the center, and gravel in the lower section beside the pond.
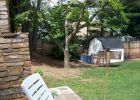
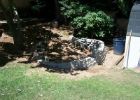
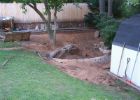
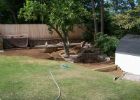
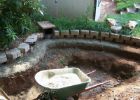
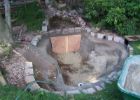
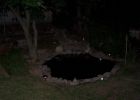
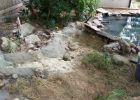
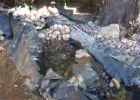
These pics show the area as it was before the project was started, and the original rough outline of the proposed pond that I scratched into the ground with a stick. This was spring or early summer of 2005.
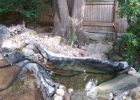
Then the initial
laying of the bricks, the framework for the stream, surrounding landscaping, and the 'big dig".

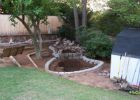

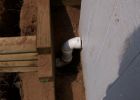
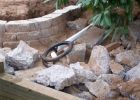
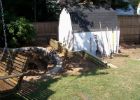
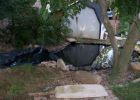
To achieve a natural look for the pond, I couldn't have the wall extend above ground level. This required a lot of new landscaping work. I built a retaining wall from 4x4's and landscape timbers to separate the pond from the shed. I started running some plumbing hose so that they could be buried and out of sight. One of the hoses shown will be for the skimmer, and the other is the discharge hose, ultimately going to the top of the stream. I ran them both through a 4" pipe, which will go into the shed. Not shown, but also in this area, I installed a 1 1/2" pipe which extends into the surface of the pond and terminates into the pile of concrete stones shown in the 3rd photo above. This was my idea for an overflow drain. During heavy rain, instead of the pond spilling over the edges, I'm hoping that this drain pie will disperse the overflow instead. I found the concrete stones in front of some guy's house. He had demolished his front steps so I knocked on his door and asked him if I could have the debris. he was of course thrilled because now he didn't have to cart it away himself. I love getting free stuff !! I used this to help fill in that area.
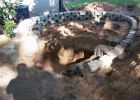
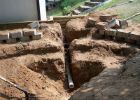
After doing some research, I decided that I should install a bottom drain, even though it required removing a good section of the completed wall and a lot more digging. This is a 3" pipe that goes from the deep end of the pond to the shed, and then runs vertically enough to enter just above the floor of the shed. These things are known as "bottom drains", but are actually used most often as an intake to the pump. Mine is plumbed as an intake, but I also put a tee in it and capped off 1 part of the tee so that in the future I could extend the plumbing right out to the street, which is at a lower level than the bottom of the pond. This way I could use it to drain the entire pond.
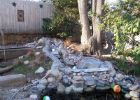
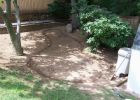
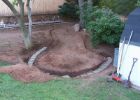
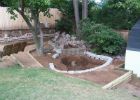
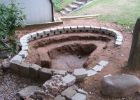
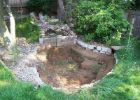
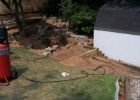
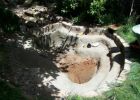
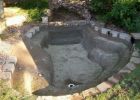
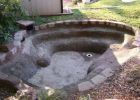
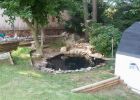
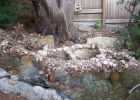
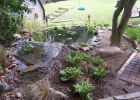
In the 1st picture you can see the trench that I dug for the bottom drain. The 2nd picture is an overview of where I am at this point, and the 3rd is a good shot of the completed dig out for the main pond. The section just below the bricks is the marginal shelf. I left the next section on place for 2 reasons...I thought it might be good for the fish to have a few different depths to hang around in, and also it saved me a heck of a lot more digging, and at this point I did not need any more fill, so I would have had to haul it all way to the dump. The right side of the pond as you look at the 3rd picture is the proposed beach. I wanted to have a sloped area for frogs to be able to get in and out of, and I thought it would have a nice look to it, but I was strongly advised to remove the beach to discourage predators such as raccoons to be able to get in, so I removed the beach way later in the project.
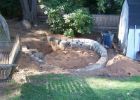
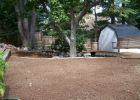
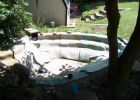
This is the stage at which I wrapped up the project for 2005. Things are starting to look good and I'm getting real excited about the project. I got a big load of topsoil and wheel-barrowed it in to finish off the landscaping. At this point I am right on schedule with the job. I planted grass in all of the dirt areas and put gravel in the lower section by the old beach.
In the spring of 2006, I removed all of the tarps and other junk that I had in the hole all winter. As I look back at this picture it's disappointing, because look how nice all of the grass grew in. I wanted to have wild, natural looking vegetation around the pond rather than a manicured look, and luckily I achieved exactly what I wanted. The problem is, it never stopped raining for about 10 weeks early this summer, so everybody's plants and new grass took a bad beating. I actually lost ALL of the grass around the pond, and will have to replant all of it in the fall. I watered and cared for this grass for a long time, and it came in beautifully, but I guess it was just too young to be able to handle 7" of rain a week for 10 weeks (beautiful place to live).
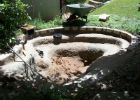
You are now looking at summer of 2006. After doing some minor repairs to the dirt where places collapsed over the winter from stepping on it and stuff, I decided that I would line the hole with concrete. I did this to try to discourage any roots from possibly growing through the liner (I don't know if this is possible or not), and also to hold everything in place while lining and filling the pond. This concrete job was nothing fancy. I simply mixed a batch at a time in the wheel barrow and slopped it on in handfuls. I also had to stuff concrete in between all of the bricks to have a smooth surface for the liner to go against. You can also see the installation of the skimmer, bottom drain, and overflow drain in these pictures. The day after I did this concrete work we got another week-long run of an inch of rain a day, but amazingly all of the concrete held in place. That was the final blow for the grass though (beautiful place to live).
The only concrete work that required pouring into a form was at the base of the waterfall. my plan is to place large rocks from the top of the waterfall to the floor of the pond, so I wanted good support there. After pouring the wall I decided to add the other "step" in front of it, which ended up working great.
I put a thick layer of nice beach sand at the base of the hole to protect the liner, and lined the entire hole with carpet padding. I also made sure that I grinded down any sharp or rough edges in the bricks that could puncture the liner. The last photo is a nice shot of the hole all covered in concrete, padding, sand on the bottom, and ready to line.
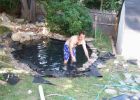
Here we go with the long-awaited lining and filling day ! I've been looking forward to this day since early last summer. Up to this point this project has actually been very enjoyable. As I look back at the pictures I am reminded of all the hard work that I put into it, but I can honestly say that I enjoyed all of it. I used to enjoy sitting on my rock by the hole at day's end and planning the next step, all the while envisioning what the final product would look like. It's weird how even sitting by a dirt hole was some how relaxing, now here we were ready to fill it up at last.
My biggest concern now was if my brick work was actually level all the way around. I was very careful to check it all around with the laser level very often, but still would not know for sure how I did until the pond was full. Since of course water is always level, my concern was that there might be a lot of liner showing on 1 side while the water level was right to the edge on another.
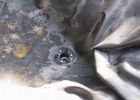
These pictures show the liner unrolled and ready to go. The liner was another free windfall from a friend who had it left over from a roofing job he did. Standard pond liners are .045 thick, but this roofing liner is .060 which makes it more robust but theoretically more difficult to maneuver around the edges and contours. My main concern with the liner is that liners sold for pond use are advertised as being "safe for fish", and some of the information that I found on-line expressed concern that roofing material might not be. never one to turn down free stuff, I decided to go with it anyhow. The 2nd photo is the liner centered in the hole and ready to fill, and the 3rd shows where the bottom drain was cut into and installed into the liner (scary).
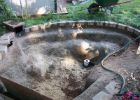
Dad came over to help with the fill, but of course he was nowhere to be found last year when I was digging. Then you can see it being filled, and the 6th shot is the pond, finally full. Next, me placing the thin wall stones around the edge of the water to hide the liner. My leveling job ended up nearly perfect ! I also got lucky with the wall stones. These are always sold in pallet loads and cost about 250 dollars. it just so happens that the day I went to the stone place they had a broken pallet so I was able to buy it by the pound, which ended up only 40 bucks.
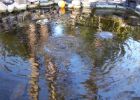
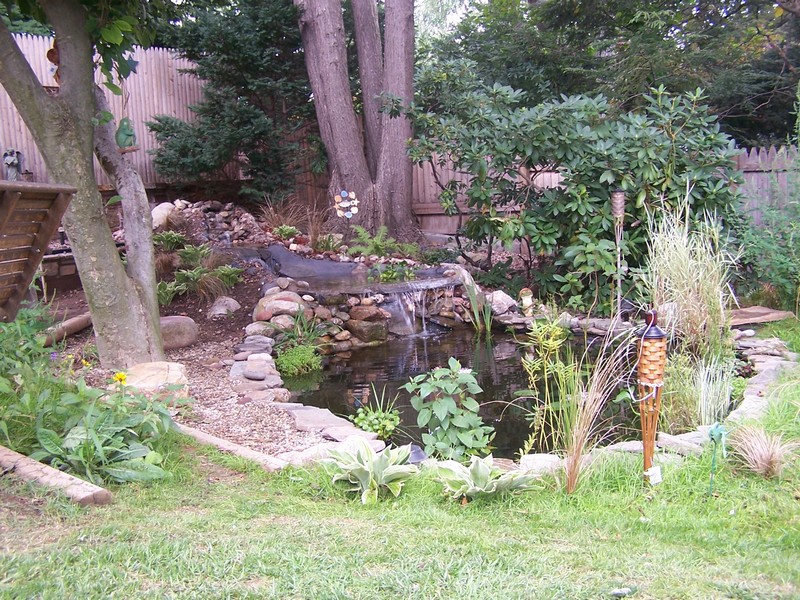
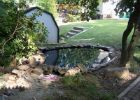
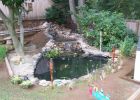
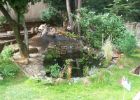
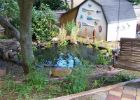
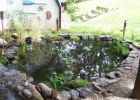
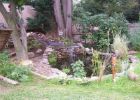
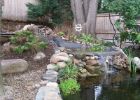
Then some nice shots of the filled main pond. The low-voltage lights look nice at night. I also had to dig a trench for the electrical wire this fall to get power to the shed for the lights and pumps. I considered underwater lighting which would look cool, but decided that I'd rather have the fish in as natural an environment as I could. Also, I read somewhere that if the water is not perfectly clear the lights would just make the water look crappy.
The main pond is now largely complete. The area above the pond is the proposed "pool". The stream will flow into this pool, and the water in the pool will then be the source of the waterfall. In these pictures I have the pool liner installed temporarily and some logs in place to give me a sneak preview of the waterfall effect. You can also see the nice small patio that I made out of paver bricks.
This stage of the project officially completes "phase 1", which is main pond construction. Phase 2 will be plumbing and filtration, phase 3 is constructing the pool and stream, and the final phase will be to add fish and plants to the pond and to finish up the planting and landscaping around the pond. I probably won't put any fish in it until next year, since it's getting close to August now, and I read that you have to wait I think 1 or 2 months for the chlorine to dissipate before you can add fish.


OK I'm back !! It is now September 4. It has been about 5 weeks since my last update, and much has occurred. Up until now, this project has been enjoyable for the most part, but for the last 5 weeks I have been having a bad time with a lot of things. I will start by showing you the 2nd phase of the job, the filter construction and plumbing.
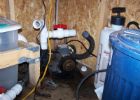
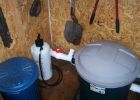
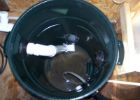
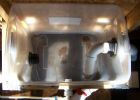
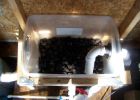
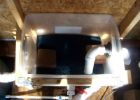
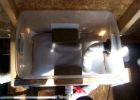
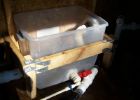
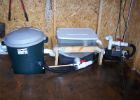
The existing shed has become the pump house. The plumbing from the bottom drain enters the pump house at the left rear corner, as shown in the first picture. The water enters a vortex chamber (32 gallon trash can) and is plumbed to the bottom of the chamber where it swirls, rises, and exits a discharge near the top, where it flows into the filter. The theory behind the vortex is that the swirling motion of the water causes the solids to settle to the bottom, and it works well. The thin clear tubing seen in the 2nd picture is the line from the skimmer, which I routed into the vortex.
I made the filter from a plastic storage bin. The water from the vortex enters at the left on the bottom, and exits on the right side near the top. The first stage of filtration is lava rock as seen in the 4th picture. Next is a filter from a furnace that I found at my "local home improvement store". Finally, there are 2 layers of fine pond filter material. The water exits at the top right of the filter into the pump. The final picture shows the entire system. To make a long story short, I had lots of troubles constructing this system. I knew there would be a chance that the water would not "move" the way I wanted it to, and I was correct. I had to move things around a couple of times to get everything flowing right, including having to cut a hole in the shed floor so that I could lower the level of the vortex chamber. Anytime you build plumbing from scratch it always involves a zillion trips to the store for more stuff, and this was no exception. After a LOT of redesigning and reconfiguring, I finally had everything flowing just right. I think it ended up taking a week or more to get all of this done.
So, here we are now, the main pond is full and the pump and filters are running good, but I'm disappointed in how long it took to get all of the plumbing problems taken care of. I learned that instead of waiting for the chlorine in the water to dissipate, there is a dechlorinating chemical that can be added to speed up the process. I needed something to get me psyched again so I decided to put some fish in the pond. I enjoyed seeing them in there but this would prove to be a bad idea. When doing some landscaping work around the perimeter of the pond, spilling some dirt and concrete mix into the pond was inevitable. This caused the water to get really dirty and cloudy, and I lost a couple of fish because of it.
This turned out to be another week or so of going into the pond with a broom and sweeping up junk from the bottom, and doing partial water changes, etc. and got very tiring. Also, I was stressed out because I could tell the fish were unhappy and I didn't want to lose anymore. Finally I was able to get the bottom and the water clean. It stayed crystal clear for a while but then algae began to take over and it looked really bad again. After trying a few chemical clarifiers, I decided to just leave it alone and try to let it clean itself naturally. I washed out the filters twice a day, and each day I could see the water get a little clearer until finally I got up one morning to find it almost crystal clear again !
The pump, filters, and plumbing are now complete as is the main pond. The water is nice and clean and the fish are happy.
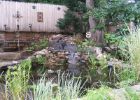
It's time now to move on to the final phase of the project, which will be completing the stream and waterfall. I started by laying the pool liner in place, filling it, and making a temporary waterfall from firewood just to get an idea of where I was at and where the water level would end up.
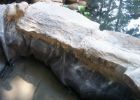
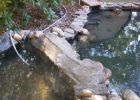
Next was building the weir, which is the "edge" of the waterfall. This was hard work. The top 2 rocks for the weir are very big and heavy, and had to be positioned just right and perfectly level, and secured and cemented in so that they would never move.
My next big mistake was leaving the "temporary" pool liner in place while building the weir. All of the manipulating of the rocks while standing on the liner caused me to puncture the liner in several places, so I had to remove it to find and repair the leaks. I re-installed the liner, tucking it under the weir and cementing it in place. Next, I put the stream liner in place and attempted to attach the stream liner to the pool liner. Had I looked back at my notes, I would have known that you must do this before installing the liner, on flat ground. I knew when trying to do this with the liners installed that it was not a good idea, since I had to deal with the folds and stuff. I did the best I could, but ultimately this would cause me to have tremendous headaches with leaks.
The Quikrete water-stop cement is essential for sealing between rocks and building up areas to divert water flow, since it dries and becomes waterproof in minutes. It's expensive and I used a lot of it, but it sure beats having to wait until the next day to flow water.
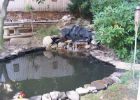
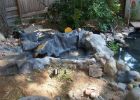
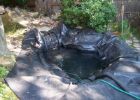
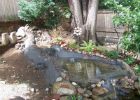
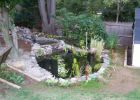
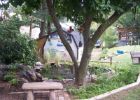
I continued to have a lot of problems with leaks in the pool. It would go down a few inches and stay at that level, but even so, I could not find the leak. Time after time I applied silicone and concrete to areas that were suspect, but still the pool would always leak down to the same level. meanwhile, as you can see in the pictures above I built the round stone planting areas beside the stream, and started to do some plantings around the pond, as well as threw in 2 floating water hyacinth plants.
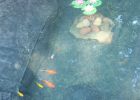
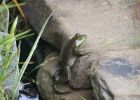
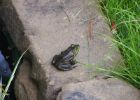
I put some more fish in, since the pond water is now consistently clear, and I even went out to a dirt road that I know of and did some frog hunting. I managed to snag 2 of them. They lived in a dirty old mud puddle so I'm sure they wouldn't have lasted long there anyhow. I hate to have to use the "C" word, but these guys are just so cute. I guess they either hide or go walking around, because most of the time I can't find them, but every once in a while one of them will show up somewhere. I only saw 2 of them at the same time once, and haven't again since so I'm not sure if both of them are still around or just one. I get a kick out of seeing them when they show up though. I also put in the pond plants, which look really nice.
(slide show below)
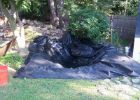
Things are looking good, but I'm still having leaks in the pool and/or stream that I cannot find or repair, and now I have just a big mess of siliconed seams and patches. We are about to leave for 10 days for vacation, and I would like to solve this problem before we go. The last thing I can think of before removing and replacing both the pool and stream liners is to line the entire pool with concrete. So, another day spent on leak repair. I dyed the mortar mix dark grey and lined the entire pool with it. I have no idea if this is going to work, but it sure looks nice.
(slide show below)
So, it's now August 23rd, and we're about to leave for vacation. I'm going to wait until we get back to try filling the pool again, thinking that it would be good to let the concrete set up for as long as possible. I commissioned the kid across the street to feed the fish and to keep an eye on things while we were gone. I had no idea what I would find when we got back, but everything looked good. The water was nice and clear, the filters were filthy and needed a real good cleaning, the pump was running, and the fish were happy, although it looks like I lost a couple of them to predators.
I filled up the pool the day after returning from vacation and nervously waited out the next several hours to see if that leak would re-appear. Got it, finally ! The pool is holding water and now I can connect the rest of the tubing to the top of the stream.
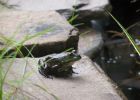
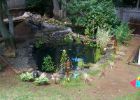
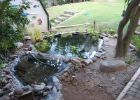
September 6 now, and I'm finally considering this job to be complete, at least for this year. Looks great. Finished up the rest of the landscaping and planting, and cleaned everything up. When I got home from work this morning after a night shift, I found water flowing nicely, clear water, not much water loss, happy fish, and one of the frogs basking on a rock. I'm still having a little bit of water loss. I've suspected for a long time a leak around the skimmer or the overflow drain, and I've been planning on repairing that next year. I think I'm losing some water high up at the top of the stream, so I'm going to raise some of it up with the water stop cement in case it's just splashing over the side or something. Not a big deal for now, I can fill it up every few days until winter if I have to and nail it next year for good. I'll continue with any updates as needed. I'll let you know what I've done in the fall to prepare for winter. It'll be interesting to say the least how things look in the Spring and how much work it will take to get it up and running and clean again. See ya for now !
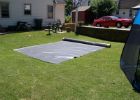
January 3, 2007. Looks like I forgot to take pictures of the pond in the fall, but back in November I shut-down the waterfall, drained out the pool, and continued to run the pump and filters with the discharge emptying directly into the pond instead of down the stream and waterfall.
For about a week I had to skim off the leaves from the surface of the pond, but just as it was getting really bad, the leaf net that I ordered from AZ Ponds arrived. That was a simple matter of stretching the net out over the surface of the pond and staking it in place. This worked great at keeping the leaves from sinking to the bottom, but the lesson I later learned was that in the future I need to make sure that the net is raised above the surface of the pond rather than just resting on the water. Even though the leaves and junk didn't sink, they still deteriorated enough in the month or so of leaf season to cause the water to get brownish and murky. After the leaves were all gone, it took only a few weeks of frequent filter changes to clean up the water again.
The last time I saw the frog was in October. he wasn't around much when it started to get a little colder, and he would re-appear on warm days, but as soon as the first real cold day hit in November I never saw again. I hope he just decided it was time to hibernate on the bottom somewhere and that he'll re-surface in the spring. Same thing pretty much with the fish. I stopped feeding them when the water temperature reached 50 degrees as recommended, and for a while I would see some of them around, but as of now there are only 2 or 3 that I still see often, and there's been no sign of any others for over a month now. No floaters though, so they probably didn't die. I hope predators didn't get to them, but that would be a weird coincidence, considering they were safe all summer and suddenly disappeared when it got cold.
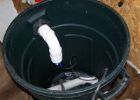
We've had a strangely mild winter so far this year. I thought I would have to winterize the pond in November, but here it is early January, and even though there's still no sub-freezing temperatures in the forecast, we're having a nice couple of days so I figure I'll get it done before we get hit with a sudden temperature drop. It wasn't that big of a deal. I shut down the pumps and emptied and blew out all the hoses and lines. I emptied and cleaned out the skimmer box, then lowered the level of the pond by about 6" to keep any more water from entering the skimmer.
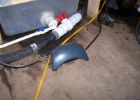
I then gave the filters a quick rinse and dry, and disassembled the pump to remove any residual water from the impeller. The biggest issue I'm faced with is how to keep the water in the main pump intake from freezing and breaking the pipe. This is the 3" pipe that runs from the pond's bottom drain underground and up into the pump house. I cut the pipe that goes into the vortex chamber and capped it off with a valve installed on the cap. Plumbed into this valve is 1/4" tubing that is connected to a simple aquarium air pump. My theory is that if I pump air into the end of this pipe, the air will travel through the pipe until it exits at the bottom drain, and the turbulence will keep the water in the pipe from freezing.
Well, it seems like it might work. I'm getting a LOT of aeration rising from the bottom drain to the pond's surface. It is important to keep the pond's surface from freezing over entirely, since this can kill the fish. I also have a floating electric surface heater which is designed for this, but I'm getting so much water agitation from the air pump that I don't think the heater will even be needed. Again, all I can do for now is to wait and see. The beach balls you see in the pictures are another experiment. Some theorize that they will absorb ice expansion to relieve pressure on the pond walls. I guess I'll see you again after we're hit with a week of single-digit temperatures. As hard as it seems to believe for all of here in the Northeast this year, we all still know that it's inevitable.
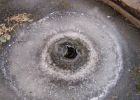
It's January 27, 2007 now, and finally we've been hit with bitter cold weather. As it got colder, of course the surface began to freeze, but with the air pump constantly running there's always been a good-sized area around the air bubbles that has not frozen. As the temperature continued to dip, the area of unfrozen water started to get smaller and smaller each day. As of this writing the hole is only about 6" in diameter. It's gonna be real cold again this week so I'll have to just hope for the best. Remember that it is critical to the health of the fish that the surface does not freeze-over entirely. I thought about breaking the ice up around the hole which would take me all of about 1 minute, but I'd rather just let this thing run it's course naturally to see if it works without any intervention from me.
My biggest worry is that the 3" pipe leading from the bottom drain to the pump house will freeze-up and break. This is the pipe through which the air is flowing. Since I'm still getting air into the pond, obviously this pipe is not frozen all the way through, but I have no way of knowing just how much turbulence is occurring inside that pipe and how much of the water inside it is in fact frozen. There's nothing I can do but wait until we get a full thaw-out to see if it worked and has not frozen and cracked.